GeoJSON / Shapefile / KML (from file)
Icon Map Pro has the ability to load shapes from files in GeoJSON, ESRI Shapefile and KML formats. These files can be hosted on an external URL and loaded at report view time, or uploaded into the visual and stored within the Power BI report file.
These shapes can then be formatted using Power BI's formatting settings, including with conditional formatting based on values in your data.
Data Setup
In order for Power BI to interact with shapes the following fields must be provided:
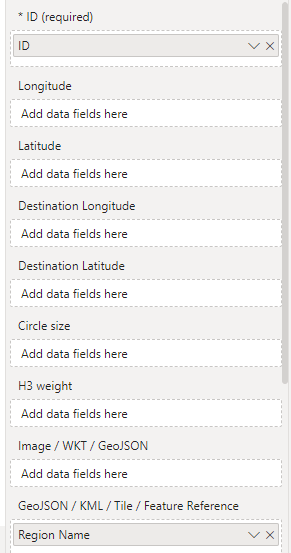
- ID - the unique reference of a feature within your file
- GeoJSON / KML / Shapefile / Tile / Feature Reference - an item from your Power BI data than can be joined with the value in a property of that feature within your file.
Sample data
| ID | Longitude | Latitude | Destination Longitude | Destination Latitude | Circle Size | Cluster Group | H3 Weight | Heatmap Weight | Image / WKT / GeoJSON | Feature Reference | Feature Weight |
|---|---|---|---|---|---|---|---|---|---|---|---|
| 1 | null | null | null | null | null | null | null | null | null | England | null |
| 2 | null | null | null | null | null | null | null | null | null | Scotland | null |
If the fill color type is set to 2 color or 3 color gradient, then the Feature Weight field should be specified.
| ID | Longitude | Latitude | Destination Longitude | Destination Latitude | Circle Size | Cluster Group | H3 Weight | Heatmap Weight | Image / WKT / GeoJSON | Feature Reference | Feature Weight |
|---|---|---|---|---|---|---|---|---|---|---|---|
| 1 | null | null | null | null | null | null | null | null | null | England | 23 |
| 2 | null | null | null | null | null | null | null | null | null | Scotland | 14 |
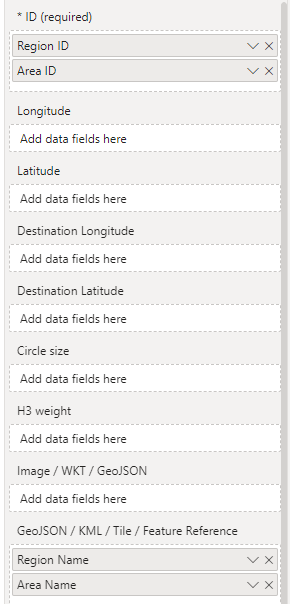
Drill down
It is possible to create multiple levels of files, and use Power BI's drill down features to view more levels of detail. Dragging the ID field of the 2nd level down into the ID field well enables drill down within the visual. The "Feature Reference" field well should contain a field to lookup the relating property for each level of drill down.
Sample data
| ID | Longitude | Latitude | Destination Longitude | Destination Latitude | Circle Size | Cluster Group | H3 Weight | Heatmap Weight | Image / WKT / GeoJSON | Feature Reference | Feature Weight |
|---|---|---|---|---|---|---|---|---|---|---|---|
| A1 | null | null | null | null | null | null | null | null | null | Surrey | null |
| A2 | null | null | null | null | null | null | null | null | null | Hampshire | null |
| B1 | null | null | null | null | null | null | null | null | null | Waverley | null |
| B2 | null | null | null | null | null | null | null | null | null | East Hampshire | null |
Setup Options

Display multiple layers as
GeoJSON / Shape layers can either work in drill-down mode, or have up to 5 layers displayed simultaneously.
![]()
To enable the layer, the "GeoJSON / Shape / KML (from file)" toggle should be enabled in the Data Layers section of the visual's formatting options.
Number of Drill-down Levels / Number of Layers

When more than one layer is enabled, the "Apply settings to" option will be shown to allow you to specify which layer the Configuration options apply to. The settings in the Setup section apply to all layers.

Source

This configures whether your files will be loaded at run time from a remote URL, or uploaded at design time from a local file, and saved inside your report.
Degrees of Simplification

When you reference an external file, in order to improve performance, it is simplified to reduce some of the coordinates using the Ramer–Douglas–Peucker algorithm. You can customize how much the lines are simplified by setting a tolerance value in degrees. Each degree equates to roughly 69 miles.
Simplification and file size reduction
When uploading a report to be saved within the Power BI report, it is important to keep it as small as possible.
It is simplified to reduce some of the coordinates using the Ramer–Douglas–Peucker algorithm. You can customize how much the lines are simplified by setting a tolerance value in degrees. Each degree equates to roughly 69 miles.
In addition the coordinates may have their level of decimal precision reduced.
It is possible to configure these settings in the configuration settings. Any changes made will be applied the next time a file is uploaded and will not impact already uploaded files.

Configuration Options
Files loaded from a remote URL
When URL is selected as the source, the URL of the GeoJSON file should be entered in the GeoJSON / File URL box.

Source is ArcGIS
If the remote URL is an ArcGIS URL, enable this option to add authentication options to the URL request.
Files uploaded from the local file system
This option allows you to upload shape files from your local file system. Unfortunately the Power BI API for third parties, doesn't provide a file upload button for use in the formatting pane. Instead, enabling the Local File option in the dropdown will display a "Display File Upload Button" toggle for each drill-down level.
- Click the "Display file upload button" toggle switch in the Configuration settings. It will immediately turn off again.

- Either drag your file to the upload area, or click the dark blue upload button - a dialog box should now appear allowing you to select your file.
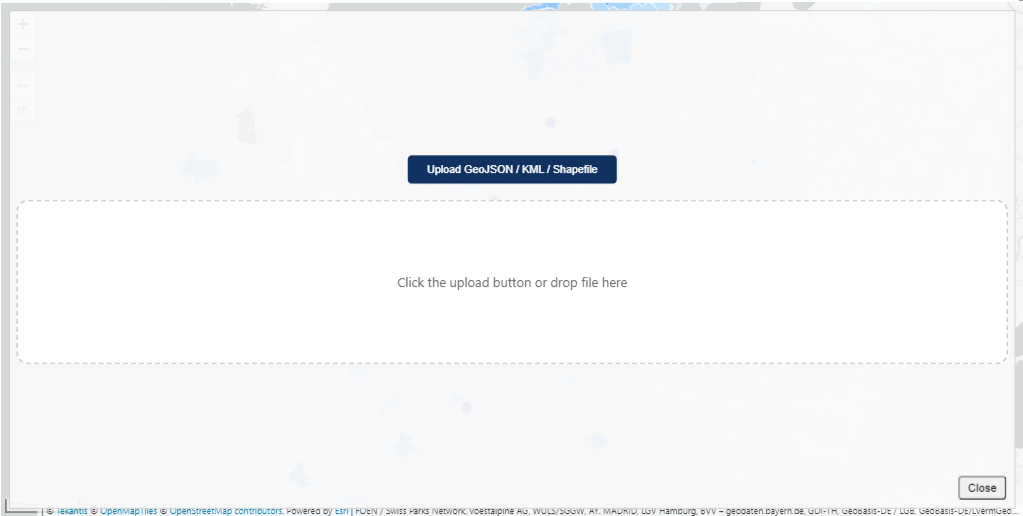
- A status popup will show your file being imported.
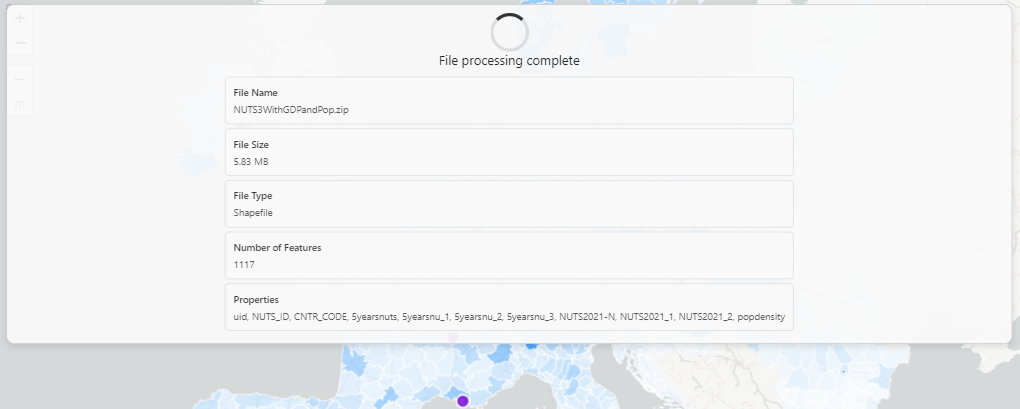
The file can be an ESRI Shapefile, a KML file, TopoJSON file or GeoJSON File. Esri Shapefiles should be provided as a zip file containing all their elements (.shp .prj etc).
KML and TopoJSON files must use the WGS84/EPSG:4326 coordinate system. However ESRI Shapefiles and GeoJSON files provided with different coordinate systems will be converted on upload.
GeoJSON files require a CRS attribute to be present for auto conversion, if the attribute is missing then Icon Map Pro will assume it is WGS84/EPSG:4326*
Feature Reference Field
When multiple layers are being displayed (rather than drill-down), you may have multiple feature reference fields applied to the "Feature Reference" data field. This option is used to select which is relevant for the current layer.

Match a Specific Property
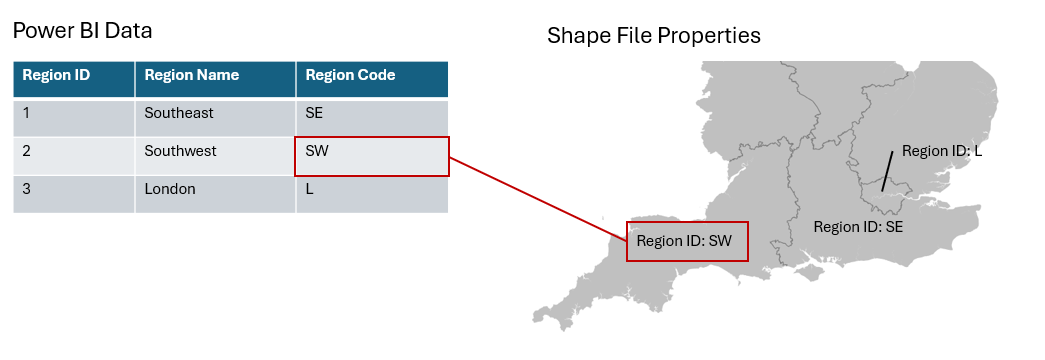
When Icon Map Pro draws the features (a point, polygon, linestring etc) from the file on the map, it tries to match each feature to a row of Power BI data in the "Feature Reference" field. It does this by checking the properties of each feature against the value in each row of data. If features have a large number of properties this can take time. Also if there are conflicts between the values in different properties, it can cause false matches.
To improve performance and avoid false matches it is possible to configure a specific property to check against.

The value in this field should be the name of the property in your file and is case sensitive.
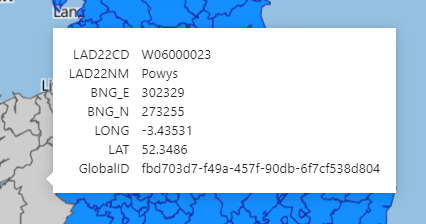
Remove Unmatched Shapes
In this example, the shape file contains Local Authority Districts (LADs) for the United Kingdom. However the Power BI data only contains LADs for England, therefore the LADs relating to Northern Ireland, Scotland and Wales are using the unmatched formatting options. Those in blue are using the match formatting options and can be formatted individually.
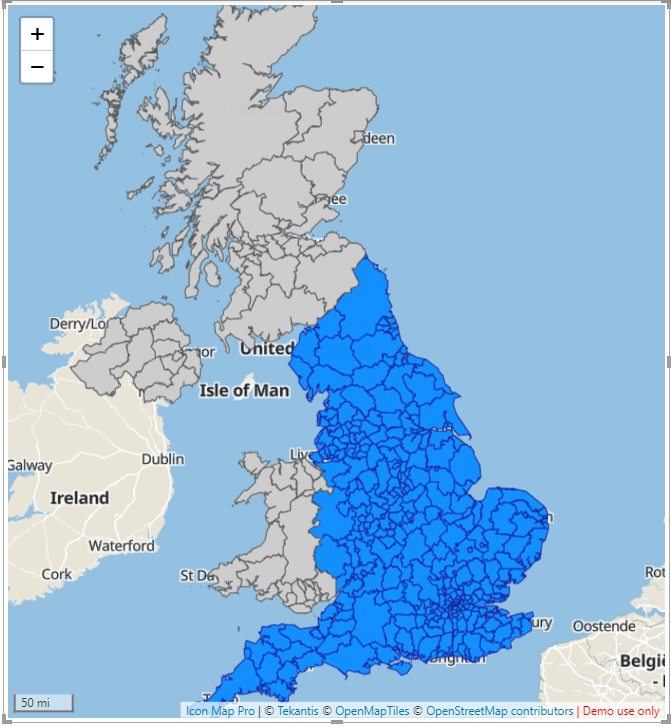
It is possible to only show shapes that have been matched against Power BI data by toggling this option.
![]()
Use WebGL Rendering
WebGL rendering enables faster performance for drawing large numbers of shapes on the map.
Convert Markers to Circles
By default, if you have any point data, these are represented as markers. It is instead possible to display these are circles, which can then inherit conditional formatting.

The size of circles can be specified as either a static value, or by using a measure. The circle radius can be specified in either pixels or meters.
Add Property to Tooltip
This provides a convenient way of adding the join field to the tooltip.
Add All Properties to Tooltip
This will add all the features of matched shapes to the tooltip.
Add Tooltips to Unmatched Shapes
This will add tooltips exposing the properties of unmatched shapes. This is also useful for debugging your shapes if matching is not occurring as you expect.
Z-Index
Set the order in which this layer appears vs other layers.

Include Tooltip
Whether to include a tooltip. Can be set to yes or no using conditional formatting to apply to specific shapes.
Include in Auto Zoom
Whether the shape should be included in the auto zoom of the map. Can be set to yes or no using conditional formatting to apply to specific shapes.
Selectable
Whether the shape can be clicked on for interaction with other visuals. Can be set to yes or no using conditional formatting to apply to specific shapes.
Minimum and Maximum Zoom
The zoom levels between which the layer should be visible.
Formatting Options
Formatting for Matched Shapes - Fill Options
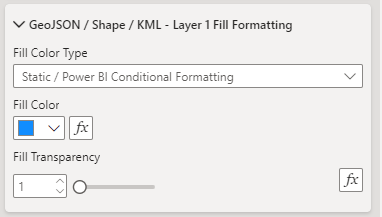
Fill Color Type
The default option is "Static / Power BI Conditional Formatting". It is also possible to determine the formatting using values in the Feature Weight field to specify a gradient or set of rules based on text values:
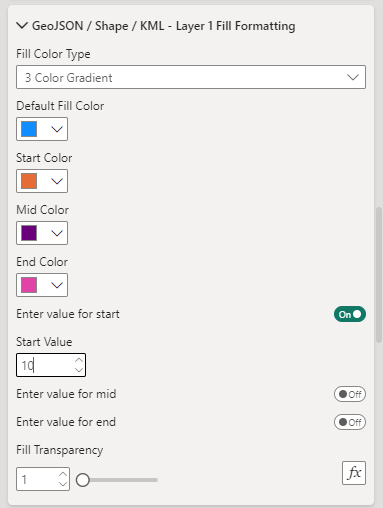
Fill Color
Fill color of a shape.
Fill Transparency
Transparency of the fill of a shape.
Fill Style (not available for WebGL Rendering)

Whether the shape is solid, hatched or pattern (WebGL rendering only)

When pattern is selected, the following options are available:
Pattern / Image URL.
Specify the the URL of a custom image to use as the fill:

or click the "Show Pattern Library" toggle to select from in-built patterns:
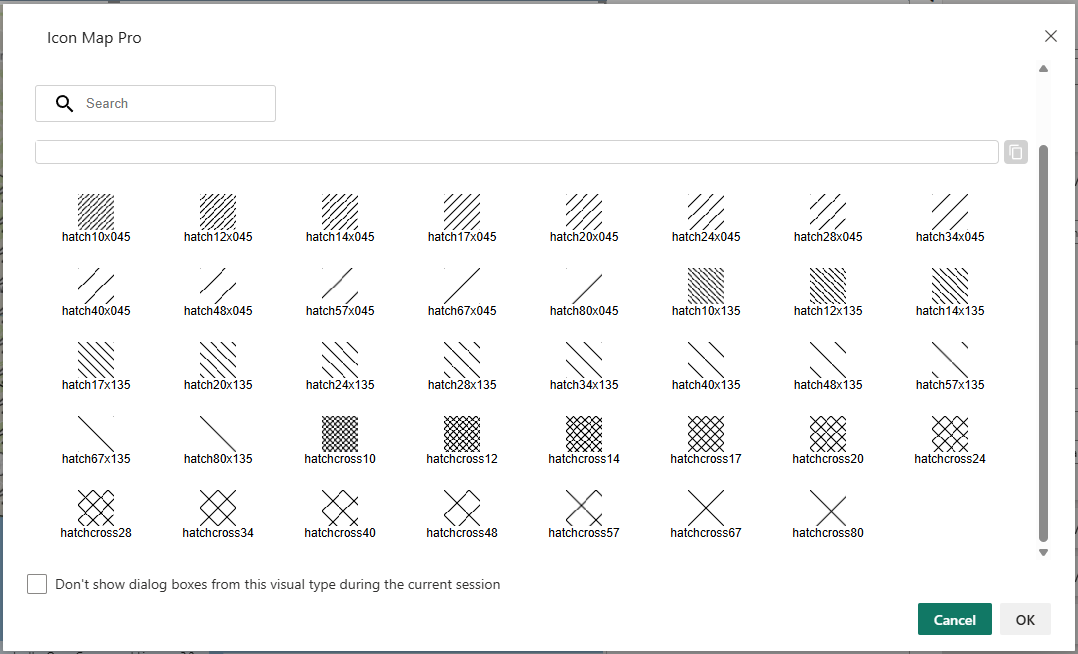
When hatched is selected, the following additional options are available:

Hatch Angle (not available for WebGL Rendering)
The angle of the lines forming the hatched fill.
Hatched Width (not available for WebGL Rendering)
The width of the lines forming the hatched fill.
Formatting for Matched Shapes - Outline Options
Outline Color Type
The default option is "Static / Power BI Conditional Formatting". It is also possible to determine the formatting using values in the Feature Weight field based on text values:

Outline color
The color of shape outlines or linestrings.
Outline transparency
Transparency shape outlines or linestrings. This should be a numeric value between 0 and 100.
Outline Width
Width of the outline in pixels. Can be a decimal number.
Dash Array #### (not available for WebGL rendering)
The dash array determines the pattern used for the line. It consists of a series of space separated numbers. Each value represents the length along the line that should be painted (the dash) and then not painted (the gap). Eg:
4 4
Formatting for Unmatched Shapes
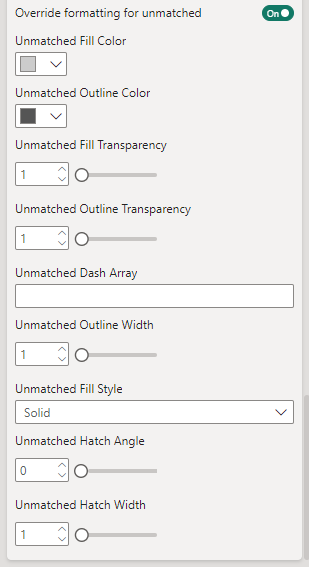
Override Formatting for Unmatched
It is possible to provide some formatting options, such as fill color, by setting property values for each feature. By default these settings are overridden by Icon Map Pro to use the Unmatched Formatting options described below. However, if you wish to preserve any formatting provided within the file itself, then toggling this option to Off will keep existing shape formatting.
Unmatched Outline color
The color of shape outlines or linestrings.
Unmatched Outline transparency
Transparency shape outlines or linestrings. This should be a numeric value between 0 and 100.
Unmatched Outline Width
Width of the outline in pixels. Can be a decimal number.
Unmatched Dash Array
The dash array determines the pattern used for the line. It consists of a series of space separated numbers. Each value represents the length along the line that should be painted (the dash) and then not painted (the gap). Eg:
4 4
Unmatched Fill Color
Fill color of a shape.
Unmatched Fill Transparency
Transparency of the fill of a shape.
Unmatched Fill Style
Whether the shape is solid or hatched.
When hatched is selected, the following additional options are available:
Unmatched Hatch Angle
The angle of the lines forming the hatched fill.
Unmatched Hatched Width
The width of the lines forming the hatched fill.